Opacity controls the transparency level of an object, determining how much background shows through, while brightness adjusts the overall lightness or darkness of the content itself. Understanding the difference helps you create visually balanced designs that maintain clarity without overwhelming the viewer.
Table of Comparison
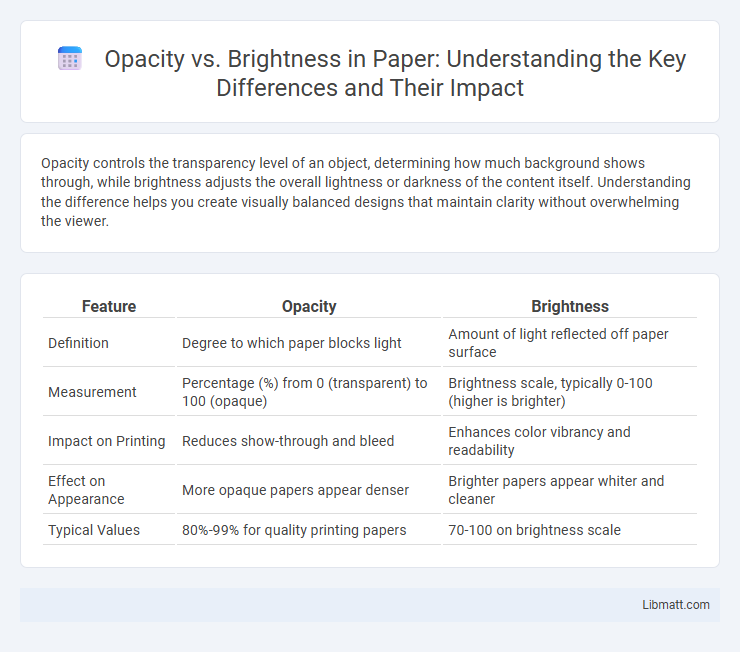
| Feature | Opacity | Brightness |
|---|---|---|
| Definition | Degree to which paper blocks light | Amount of light reflected off paper surface |
| Measurement | Percentage (%) from 0 (transparent) to 100 (opaque) | Brightness scale, typically 0-100 (higher is brighter) |
| Impact on Printing | Reduces show-through and bleed | Enhances color vibrancy and readability |
| Effect on Appearance | More opaque papers appear denser | Brighter papers appear whiter and cleaner |
| Typical Values | 80%-99% for quality printing papers | 70-100 on brightness scale |
Understanding Opacity and Brightness
Opacity measures the transparency level of an object, indicating how much light passes through it, with 0% being fully transparent and 100% completely opaque. Brightness refers to the perceived luminance of a surface or light source, impacting how light or dark the object appears to the human eye. Understanding the interplay between opacity and brightness is crucial in fields like graphic design and photography to achieve the desired visual effect and depth.
Opacity: Definition and Applications
Opacity measures the degree to which an object blocks light, determining its transparency or translucency in visual design and imaging. Your ability to control opacity influences image layering, text readability, and user interface clarity across digital platforms. This parameter plays a critical role in graphic design, photography, and web development, enhancing visual hierarchy and aesthetic appeal.
Brightness: Meaning and Use Cases
Brightness refers to the perceived intensity of light emitted or reflected by an object, influencing how vivid and clear it appears to the human eye. Commonly applied in photography, graphic design, and display technologies, brightness adjustment enhances visibility and mood, making images appear more vibrant or subdued. Your ability to manipulate brightness effectively ensures optimal clarity and impact across various visual media.
Key Differences Between Opacity and Brightness
Opacity measures the transparency level of an object, indicating how much light passes through it, whereas brightness refers to the intensity of light emitted or reflected by a surface. Opacity values range from 0% (completely transparent) to 100% (fully opaque), while brightness is often quantified by luminance or light intensity levels. Understanding these differences helps you adjust visual elements effectively in design or photography settings.
How Opacity Affects Visual Design
Opacity controls the transparency level of visual elements, influencing the hierarchy and depth within a design. Lower opacity creates a sense of layering and subtlety, allowing background elements to show through and enhancing the overall composition. Adjusting opacity strategically directs viewer attention and balances contrast, improving readability and user experience.
The Role of Brightness in Image Editing
Brightness plays a crucial role in image editing by directly influencing the visibility and vibrancy of visual elements. Adjusting brightness can enhance or diminish details, affecting the overall mood and clarity of an image. Your ability to manipulate brightness ensures balanced exposure and highlights key areas without compromising opacity, resulting in a polished and visually appealing composition.
Practical Examples: Opacity vs Brightness
Opacity controls the transparency of an element, making it partially see-through, while brightness adjusts the luminosity without affecting transparency. For instance, lowering opacity on an image makes the background visible through it, which is useful for overlay effects, whereas increasing brightness enhances the image's light intensity, making details clearer in dark scenes. Your choice between opacity and brightness depends on whether you want to blend elements or improve visibility.
When to Adjust Opacity or Brightness
Adjust opacity when you need to control the transparency of an element, allowing background layers to subtly show through for design depth or layering effects. Modify brightness to enhance or reduce the lightness of your image or object, improving visibility or mood without affecting its transparency. Your choice between opacity and brightness adjustments depends on whether you want to emphasize clarity or visual layering in your design.
Tips for Balancing Opacity and Brightness
To balance opacity and brightness effectively, start by adjusting opacity levels to maintain image clarity while preventing overexposure from excessive brightness. Use subtle opacity changes in layers to control light diffusion without losing vivid color details. Monitor histogram data to ensure brightness remains within optimal ranges that preserve highlight and shadow information for a balanced visual output.
Common Mistakes When Using Opacity and Brightness
Common mistakes when using opacity and brightness include confusing the two, leading to unintended visual effects; for example, lowering opacity reduces transparency, making elements see-through, while adjusting brightness changes the lightness or darkness without affecting transparency. Another frequent error is overusing brightness adjustments, which can wash out colors and reduce image contrast, unlike opacity changes that maintain color integrity but alter visibility. Failing to consider the context of surrounding elements often results in poor readability or visual imbalance when opacity and brightness are improperly applied.
Opacity vs brightness Infographic