Teach Mode allows you to manually guide and customize processes step-by-step for precise control, while Auto Mode enables automated execution based on pre-set parameters for efficiency and consistency. Your choice depends on whether you prioritize hands-on customization or streamlined automation.
Table of Comparison
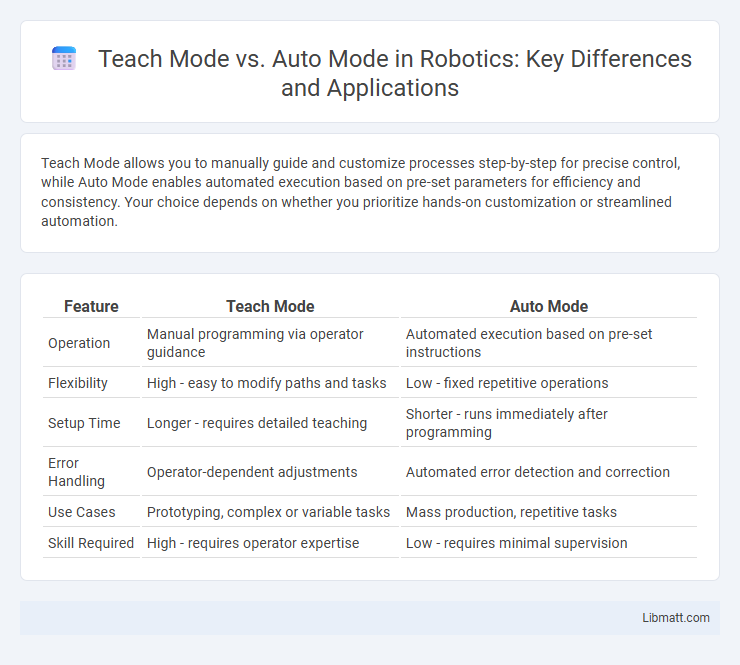
| Feature | Teach Mode | Auto Mode |
|---|---|---|
| Operation | Manual programming via operator guidance | Automated execution based on pre-set instructions |
| Flexibility | High - easy to modify paths and tasks | Low - fixed repetitive operations |
| Setup Time | Longer - requires detailed teaching | Shorter - runs immediately after programming |
| Error Handling | Operator-dependent adjustments | Automated error detection and correction |
| Use Cases | Prototyping, complex or variable tasks | Mass production, repetitive tasks |
| Skill Required | High - requires operator expertise | Low - requires minimal supervision |
Introduction to Teach Mode and Auto Mode
Teach Mode allows users to manually program and control a system step-by-step, enabling precise customization and adjustments tailored to specific tasks or processes. Auto Mode operates the system automatically based on predefined parameters and algorithms, optimizing efficiency and consistency without requiring continuous user input. Both modes enhance functionality by balancing user control with automation in various industrial and robotic applications.
Defining Teach Mode: Key Features
Teach Mode enables precise customization by allowing users to manually program specific actions and sequences tailored to unique tasks. Key features include step-by-step input, real-time adjustments, and the ability to store complex routines for repeated execution. This mode is essential for applications requiring high accuracy and flexibility in automation processes.
Understanding Auto Mode: Main Functions
Auto Mode automates key camera settings like shutter speed, aperture, and ISO to optimize exposure based on the scene, making it ideal for beginners or quick shooting scenarios. It adjusts focus, white balance, and flash settings automatically to ensure your photos are clear and well-lit without manual intervention. Understanding these main functions helps you decide when to rely on Auto Mode for convenience or switch to manual settings for creative control.
Major Differences Between Teach Mode and Auto Mode
Teach Mode requires manual programming and setup, allowing you to define specific tasks and paths for robots or machines, while Auto Mode operates based on pre-programmed instructions without continuous human intervention. Teach Mode is ideal for customization and fine-tuning in dynamic environments, whereas Auto Mode excels in repetitive, high-volume production where consistency and speed are critical. Understanding these major differences ensures efficient deployment of automation systems based on your operational needs.
Advantages of Teach Mode
Teach Mode offers precise control by allowing you to manually guide and program specific actions, enhancing customization for unique tasks. This mode reduces errors in complex operations by enabling step-by-step instruction recording, improving accuracy and reliability. Your ability to directly influence the programming process ensures tailored automation solutions that adapt to specialized workflows.
Benefits of Using Auto Mode
Auto Mode optimizes camera settings such as exposure, focus, and white balance automatically, ensuring consistently high-quality photos without manual adjustments. This mode accelerates the shooting process, making it ideal for capturing fleeting moments or for users with limited photography knowledge. Enhanced convenience and reduced risk of errors improve overall image clarity and composition effortlessly.
When to Use Teach Mode
Teach Mode is ideal when customized learning or personalization is required, such as in adaptive AI systems or personalized tutoring software. It allows users to input specific examples or feedback, enabling the system to learn from direct human guidance for improved accuracy. This mode is particularly beneficial when dealing with unique or complex tasks that standard Auto Mode algorithms cannot fully address.
Ideal Scenarios for Auto Mode
Auto Mode is ideal for beginners or casual users seeking efficiency and convenience when operating a device or software. It automatically adjusts settings based on pre-programmed parameters, allowing you to focus on results without needing in-depth technical knowledge. This mode excels in repetitive tasks, real-time decision making, and environments where quick adaptation to changing conditions is essential.
Common Challenges in Both Modes
Both Teach Mode and Auto Mode often encounter challenges such as inconsistent data input and variability in environmental conditions impacting system performance. Errors in sensor calibration and machine learning model accuracy can lead to misclassifications or incorrect actions, affecting reliability. Addressing these issues requires continuous monitoring and frequent updates to algorithms and hardware components to maintain optimal functionality.
Choosing the Right Mode for Your Needs
Teach Mode offers precise control and customization, ideal for users who require hands-on adjustments and detailed learning processes. Auto Mode provides efficiency and ease, perfect for those seeking quick results with minimal manual input. Selecting the right mode depends on your need for accuracy versus speed and the complexity of the task at hand.
Teach Mode vs Auto Mode Infographic