Tempering involves gently warming chocolate to stabilize its crystals, resulting in a smooth, glossy finish and crisp snap, while proofing refers to allowing yeast dough to rise in a warm environment to develop flavor and texture. Understanding the difference ensures your baking and confectionery projects achieve the best possible results.
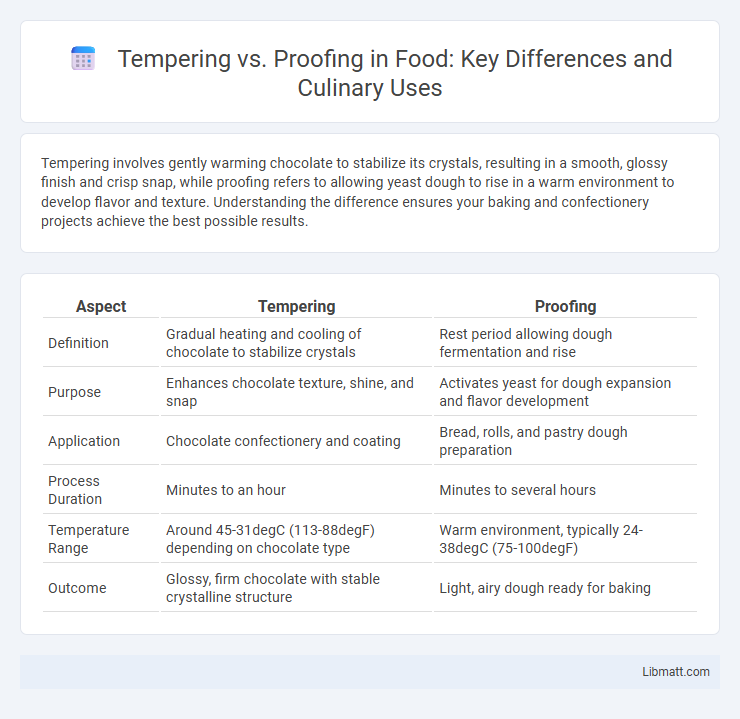
Table of Comparison
| Aspect | Tempering | Proofing |
|---|---|---|
| Definition | Gradual heating and cooling of chocolate to stabilize crystals | Rest period allowing dough fermentation and rise |
| Purpose | Enhances chocolate texture, shine, and snap | Activates yeast for dough expansion and flavor development |
| Application | Chocolate confectionery and coating | Bread, rolls, and pastry dough preparation |
| Process Duration | Minutes to an hour | Minutes to several hours |
| Temperature Range | Around 45-31degC (113-88degF) depending on chocolate type | Warm environment, typically 24-38degC (75-100degF) |
| Outcome | Glossy, firm chocolate with stable crystalline structure | Light, airy dough ready for baking |
Introduction to Tempering and Proofing
Tempering involves gently heating chocolate to specific temperatures to stabilize its crystal structure, resulting in a glossy finish and smooth texture. Proofing is the final fermentation stage of dough where yeast activates, allowing the dough to rise and develop flavor through controlled temperature and humidity. Both processes are crucial in baking and confectionery for achieving optimal texture and quality.
Defining Tempering: Key Concepts
Tempering involves gradually heating chocolate to specific temperatures to stabilize its crystalline structure, ensuring a glossy finish and firm snap. Key concepts include precise temperature control and agitation to promote the formation of stable beta crystals. This process is essential for enhancing chocolate's texture, appearance, and shelf life.
Understanding Proofing in Baking
Proofing in baking is the essential fermentation step where yeast metabolizes sugars in the dough, producing carbon dioxide that causes the dough to rise and develop flavor. Proper proofing temperature ranges between 75degF and 85degF, creating an optimal environment for yeast activity and gluten network formation. Understanding proofing directly impacts the texture, volume, and crumb structure of breads, distinguishing it critically from tempering, which involves controlling dough temperature before fermentation.
The Science Behind Tempering
Tempering involves carefully heating and cooling chocolate to stabilize the cocoa butter crystals, resulting in a glossy finish and crisp snap due to the formation of stable beta crystals. Proofing primarily applies to yeast dough, where controlled warmth encourages yeast fermentation, producing carbon dioxide that causes dough to rise. Understanding the molecular changes during tempering ensures improved texture and shelf life of chocolate products.
The Importance of Proofing Dough
Proofing dough is a critical step in bread making that allows yeast to ferment, producing carbon dioxide which causes the dough to rise and develop flavor. Proper proofing enhances the bread's texture, resulting in a light, airy crumb and improved gluten structure. In contrast, tempering involves conditioning ingredients, typically chocolate or butter, to improve consistency but does not impact dough fermentation or rise.
Tempering Process: Step-by-Step
Tempering involves carefully heating and cooling chocolate to stabilize its crystalline structure, enhancing shine and snap. The process begins by melting chocolate to about 45degC (113degF), then cooling it down to roughly 27degC (80.6degF) to encourage the formation of stable crystals, followed by reheating to around 31degC (87.8degF) for dark chocolate or slightly lower for milk and white varieties. This precise temperature control during the tempering process ensures optimal texture and appearance in the finished product.
Proofing Stages and Techniques
Proofing stages involve the initial fermentation (bulk proof) where dough doubles in size, followed by the final proof (second rise) after shaping, crucial for developing gluten structure and flavor. Techniques such as basket proofing use bannetons to support dough shape and promote even fermentation, while controlled temperature and humidity optimize yeast activity and dough texture. Proper proofing results in improved crumb, oven spring, and crust quality, distinguishing artisan bread from mass-produced varieties.
Comparing Tempering vs Proofing: Core Differences
Tempering involves gradually heating chocolate to specific temperatures to stabilize its crystal structure, enhancing its shine and snap, while proofing is the process of allowing yeast dough to rise and develop flavor through fermentation. Tempering is crucial for achieving the ideal texture in confections, whereas proofing is essential for dough expansion and crumb structure in baking. The core difference lies in tempering manipulating temperature to alter chocolate crystallization, while proofing relies on yeast activity for leavening.
Common Mistakes in Tempering and Proofing
Common mistakes in tempering chocolate include overheating, which causes it to lose its glossy finish and snap, and failing to maintain precise temperature control during the process. In proofing dough, errors often involve proofing at incorrect temperatures or for too long, leading to overproofed dough that collapses or underproofed dough that lacks volume. Both processes require careful monitoring of temperature and timing to achieve optimal texture and quality in the final product.
Tips for Perfect Tempering and Proofing
Achieve perfect tempering by heating chocolate to precise temperatures: typically 45-50degC for dark chocolate, then cooling to 27-28degC before slight reheating to 31-32degC to form stable crystals for shine and snap. For proofing dough, maintain a warm, humid environment around 27-30degC with 75-85% humidity to allow yeast fermentation, resulting in optimal rise and texture. Use a kitchen thermometer for accuracy and avoid drafts or extreme temperature swings to ensure consistent results.
Tempering vs Proofing Infographic